While there are lots of collaboration tools out there, email still remains one of the most preferred modes to communicate with in distributed teams. While development teams are closest to using team foundation server, you may find that support or operations team may not be familiar with the functions of team foundation server especially if these teams have other tools they use to manage their work. In this blogpost we’ll learn about an open source tool called Mail2Bug. Mail2Bug is a service that allows you to create a bug from an e-mail thread simply by adding a specific recipient to the mail thread. It also keeps the bug up-to-date with information from the mail thread by adding any subsequent replies on the thread as comments to the bug. Bug2Mail is a tool that’s been long used by Microsoft internally, you can read the announcement on it being open sourced on Brian’s blog here.
Pre-requisites
-
We’ll be adding a new field to the bug type work item in order to enable the bug2mail service to track the work item revisions appended by parsing the content of the emails into the work item. Since the out of box process templates has been locked down for customization in TFS 2015, before we can add the custom field that we need, we’ll need to export the out of box template and change the guid in the version tag. From team explorer go into settings view, launch the process template manager and download the default scrum template to a folder location. Open the ProcessTemplate.xml from that folder location and replace the guid in the version tag with a new guid generated from visual studio. Additionally change the name of the process template and up the minor version. Once completed the ProcessTemplate.xml should look like this…

Next… In the process template folder, navigate to .\WorkItem Tracking\TypeDefinitions and open Bug.xml in notepad. Search for the tag /fields add the below code before the closing tag
<FIELD name="ConversationId" refname="Custom.ConversationId" type="String">
<HELPTEXT>This field is used by Mail2Bug</HELPTEXT>
</FIELD>
Search for FieldName="Microsoft.VSTS.Common.Severity" add the below code in the next line
<Control FieldName="Custom.ConversationId" Type="FieldControl"
Label="ConversationId" LabelPosition="Left" />
Once this has been completed, upload the process template into tfs using the process template manager and create a new team project using the new process template. Call the team project - Fabrikam.
-
The Mail2Bug tool requires that an exchange or office 365 account. For this blogpost we’ll be using an exchange account [email protected]. Ensure you have the password available for this service account.
-
Make sure user account Mail2Bug has access to project level information and work item create permissions on the fabrikam team project. This can easily be done by adding the user to the build administrators group in the fabrikam team project.
-
Ensure you have access to log in to the server where you intend to run the mail2bug service from, the server should have firewall exceptions in place to successfully connect to team foundation server. This can be validated by browsing to the fabrikam web access page from the server.
-
Ensure that the user used to run the mail2bug service has permissions to the fabrikam team project to view collection level information. This can be done by adding the user to the build administrator group in the fabrikam team project.
Setup and Configuration
The set up and configuration is divided into two sections…
Generating the binaries
- Navigate to the Mail2Bug github page and clone the repo
- Open the solution file (Mail2Bug.sln) in Visual Studio
- Make sure that NuGet is allowed to download packages automatically
- This setting is under Tools->Options->PackageManager->General->Allow NuGet to download missing packages during build
- Build the solution
- All the required binaries can will be in the output folders
- For Mail2Bug itself, all binaries are under <projectRoot>\Mail2Bug\Bin(Debug|Release)\…
- For the DpapiTool, binaries are under <projectRoot>\Tools\DpapiTool\Bin(Debug|Release)\…
Setting up and configuring the service
-
To set up and configure the service follow the instructions here
The completed config file for our project looks like following…
<?xml version="1.0"?>
<Config xmlns:xsi="http://www.w3.org/2001/XMLSchema-instance"
xmlns:xsd="http://www.w3.org/2001/XMLSchema">
<Instances>
<InstanceConfig Name="Fabrikam">
<TfsServerConfig>
<CollectionUri>tfs2015:8080/tfs/defaultcollection/</CollectionUri>
<Project>Fabrikam</Project>
<WorkItemTemplate>Bug</WorkItemTemplate>
<!-- see example query file in the same folder as this example config-->
<CacheQueryFile>.\Resources\Query.wiq</CacheQueryFile>
<SimulationMode>false</SimulationMode>
<NamesListFieldName>Assigned To</NamesListFieldName>
</TfsServerConfig>
<WorkItemSettings>
<!-- The conversation index field should be a textual field with a capacity
of 200 or more. Ideally you'll create a dedicated field for this rather
than overloading an existing one, to avoid other people/tools overwriting
it with unrelated data. Also, by making it dedicated, you can also make
the decision to make it invisible (since no one should be editing it manually)-->
<ConversationIndexFieldName>ConverstionID</ConversationIndexFieldName>
<DefaultFieldValues>
<!-- The important part is to include a default value for every mandatory
field, otherwise work item creation will fail. The only automatically
defined default is the 'Title' field, that gets the email
subject as a value. -->
<DefaultValueDefinition Field="Assigned To" Value="Unassigned" />
<DefaultValueDefinition Field="Severity" Value="1" />
<DefaultValueDefinition Field="Area Path" Value="Fabrikam" />
<DefaultValueDefinition Field="Iteration Path" Value="Fabrikam" />
<DefaultValueDefinition Field="Description" Value="##MessageBody" />
</DefaultFieldValues>
<!-- 'true' means we should attached the email message that triggered the
creation of the work item -->
<AttachOriginalMessage>true</AttachOriginalMessage>
</WorkItemSettings>
<EmailSettings>
<!-- EWSByRecipients is the most straight-forward way to set up the mailbox.
Basically, it will process any email in the Inbox that has any of the
recipients in the To or Cc fields. Recipients can be specified as
email addresses, or as display names. When specifying more than one
recipient, use ; as separator -->
<ServiceType>EWSByRecipients</ServiceType>
<Recipients></Recipients>
<!-- The email address whose inbox that we want to monitor -->
<EWSMailboxAddress>[email protected]</EWSMailboxAddress>
<!-- A username with permissions to log in to the email account. This is
generally either in the form of email address form (usually the same as
the email address in EWSMailboxAddress), or in DOMAIN\username
form. I've seen cases where the same server would take one or
the other (or both), depending on the server set up, as well as the
client set up, so if one doesn't work, try the other -->
<EWSUsername>[email protected]</EWSUsername>
<!-- Pointer to a file that stores the password for the login account. The
file is expected to be encrypted with DPAPI - use the DpapiTool.exe from
the Tools subfolder to create one. Note that the tool needs to be
run under the same credentials that mail2bug will run with, otherwise
it won't be able to decrypt the contents. -->
<EWSPasswordFile>.\Resources\mail2bug.bin</EWSPasswordFile>
<SendAckEmails>true</SendAckEmails>
<AckEmailsRecipientsAll>true</AckEmailsRecipientsAll>
<!-- A pointer to a file containing the ack email template for sending back
responses when a new work item is created-->
<ReplyTemplate>.\Resources\ReplyTemplateExample.htm</ReplyTemplate>
<!-- Ideally, you'll never need to change these regexes and you'll use the
defaults below, but they do give you the flexibility to define your own
format for specifying overrides, or detecting that an email is an "append
only" email. Don't forget to escape any angle brackets. -->
<AppendOnlyEmailTitleRegex>
.*(bug|work item)\s*#*\s*(?<id>\d+)
</AppendOnlyEmailTitleRegex>
<AppendOnlyEmailBodyRegex>
!!!(bug|work item)\s*#*\s*(?<id>\d+)
</AppendOnlyEmailBodyRegex>
<ExplicitOverridesRegex>
###\s*(?<fieldName>[^:]*):\s*(?<value>.*)
</ExplicitOverridesRegex>
</EmailSettings>
</InstanceConfig>
</Instances>
</Config>
A few things to keep in mind…
- CacheQueryFile - If a work item is not captured by the query, new messages on the thread that created the item would create a new item instead of appending to the existing one. The standard set up is to provide a query that pulls all the items created by the mail2bug service account (regardless of state). To create the query file, just create the query in a visual studio and save it locally to a file. Place the file where the other configuration files are and put the path to that file in the CacheQueryFile setting in the config.
- User - The user that will be used to run the mail2bug service should have permissions to create work items and view project level information in the team project. The password file being referenced in the config file should be generated using the DPAPI tool by running the command prompt as the user account.
Be sure to include the project name in the Query.wiq, you can optionally add createdby as the username to avoid validating bugs that may not have been created by the mail2bug service
<?xml version="1.0" encoding="utf-8"?>
<WorkItemQuery Version="1">
<TeamFoundationServer>http://tfs2015:8080/tfs/defaultcollection</TeamFoundationServer>
<TeamProject>Fabrikam</TeamProject>
<Wiql>SELECT [System.Id], [System.WorkItemType], [System.Title], [System.AssignedTo],
[System.State], [System.Tags] FROM WorkItems WHERE [System.TeamProject] = 'Fabrikam'
AND [System.WorkItemType] = 'Bug' AND [System.State] <> ''
AND [System.CreatedBy] = 'mail2bug'
ORDER BY [System.Id] </Wiql>
</WorkItemQuery>
The configuration has setting to enable disable sending acknowledgment emails, this is a great way of knowing whether the email thread has been successfully configured by the Mail2Bug service. The email response can also be templated using HTML, I’ve used the following format for the response email. Of course, you can get more creative and instead of just having [BUGID] you can prefix this with the collection name to form the bug url.
<html>
<body>
Auto Acknowledgement
<p>The email has been successfully processed by Bug2Mail service,
the information has been updated on [TFSCollectionUri] in [BUGID]</p>
</body>
</html>
If you plan to use Mail2Bug for multiple projects, you would need a config instance per project, but only one instance of the service (i.e. running executable) to handle all those instances. The config instances can be inside a single config file - as different ‘InstanceConfig’ nodes - or spread across multiple config files. The single-file config is easier to manage if there’s only one or a handful of people managing the config, but if different teams manage their own configs it’s advisable to separate instances based on owners. The reason is that if anyone makes changes that result in a badly formatted XML, the whole config file is not loaded, but other files are not affected. Some more details can be found in the annotated config, in the comment for the “Instances” and “ConfigInstance” nodes: github.com/…/FullyAnnotatedConfigReference.xml
Testing the service
Manually trigger the execeution of the service by running the command line using the account that will be used to run the mail2bug service, trigger the mail2bug.exe. Follow the log file for any warnings and errors. If the set up and configuration is correct, the service will start monitoring the mailbox. Send a test email to [email protected] mailbox, the console should log a new message has been found. Once the message has been processed it will be moved to the deleted folder and a new work item will be created under the fabrikam team project.
The service is initalized and the monitoring is kicked off…

The new message in the mailbox is processed and moved to the delete folder…

The work item is generated in the fabrikam team project, the default values specified in the config file are set and the rest of the values are populated from the email message. The origional email is attached to the work item in the attachment tab.

The custom filed conId that we added after customizing the process temaplate is also updated. This field should not be modified manually.

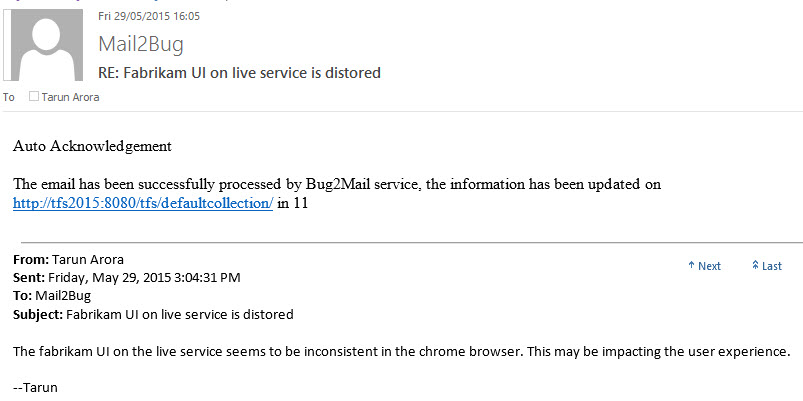
The Mail2Bug service send back an acknowledgement email to confirm that a bug has been created.

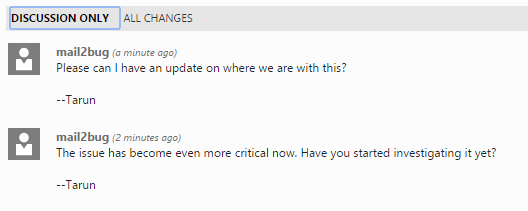
Further communication on the email (as long as the mail2bug email address is in the to or cc line) is automatically appended into the work item discussion area.

Once the service set up has been validated by manually triggering the workflow, the service should be set up to run as a scheduled task on the server.
The service offers other interesting features as well, for example, you can link work items by using the format ‘!!!work item #1234’.
Summary
Simply put, the idea is to reduce friction and effort. Ever been on an e-mail thread where some issue was discussed, when at some point someone asked you to “Please open a bug for this issue”? Mail2Bug tries to reduce the effort associated with that scenario by allowing you to easily create a bug with all the information from the thread with the simple action of adding the relevant alias to the thread. It also keeps the TFS item up to date with any new information from the thread, making sure that information is not lost and is easy to find by looking at the bug. Another common scenario is for support organizations - for automatically creating a ticket for incoming emails, and keeping further communiations on the email thread updated in the ticket.


