Continuous build and deployment of Visual Studio extensions using Azure Pipelines
Sep 27, 2018 | Utkarsh Shigihalli
| 5 min read
DevOps
Azure Pipelines
Pipelines
Azure DevOps
Extensions
Utkarsh Shigihalli
| 5 min read
DevOps
Azure Pipelines
Pipelines
Azure DevOps
Extensions
Visual Studio extensions are great to extend and add additional features/enhancements to the Visual Studio IDE. Unfortunately, until now there was no better way to implement a proper CI/CD for your Visual Studio extensions. In this blog post I will show you how you can setup continuous build and deployment for your Visual Studio extensions.
If you have been an Visual Studio extension developer you know that there is not a well defined process to continuously deliver to the Visual Studio Marketplace. Couple of years ago, Mads Kristensen’s Extensibility Tools in combination with his https://vsixgallery.com reduced some pain where you could implement CI/CD to his vsixgallery, but eventually you still had to manually upload the extension to VS Marketplace upon your testing.
Fortunately there is a now a new command line tool called VSIXPublisher from Microsoft. With this tool we can continuously build and deploy our Visual Studio extensions using Azure Pipelines to VS Marketplace.
The command line
The VSIXPublisher exe is installed with Visual Studio SDK and also available via VSSDK Build Tools nuget.
The command line provides us various commands to
- Login and Logout
- Publish the extension
- Create the publisher
- Delete the publisher
- Delete the extension
In this post we will only be using login and publish commands. But you can see that tool also supports other useful features like create/delete publisher or delete your extension from marketplace.
For publishing an Visual Studio extension using this tool you will need a publisher id and a personal access token (PAT). For this post, I am assuming you already have a publisher id. If not go ahead and use the command line to create the publisher for yourself. For creating PAT, you will need to follow steps defined here
Preparing your extension for publishing
The first thing we need is to add a publishManifest file. This is a simple JSON file describing metadata of your extension. For more details on the structure read here
You can name your manifest file anything you like. For my extension I created a manifest file as extension.manifest.json (link) with contents as below.
{
  "$schema": "http://json.schemastore.org/vsix-publish",
  "categories": [ "build", "coding" ],
  "identity": {
    "internalName": "InfoBarDemo"
  },
  "assetFiles": [
    {
      "pathOnDisk": "images\\custom-command-item.png",
      "targetPath": "images/custom-command-item.png"
    },
    {
      "pathOnDisk": "images\\extension-dev-workload.png",
      "targetPath": "images/extension-dev-workload.png"
    },
    {
      "pathOnDisk": "images\\image-catalog-reference.png",
      "targetPath": "images/image-catalog-reference.png"
    },
    {
      "pathOnDisk": "images\\new-project.png",
      "targetPath": "images/new-project.png"
    },
    {
      "pathOnDisk": "images\\tools-menu-item.png",
      "targetPath": "images/tools-menu-item.png"
    },
    {
      "pathOnDisk": "images\\vs-infobar-actions.png",
      "targetPath": "images/vs-infobar-actions.png"
    },
    {
      "pathOnDisk": "images\\vs-infobar.png",
      "targetPath": "images/vs-infobar.png"
    }
  ],
  "overview": "readme.md",
  "priceCategory": "free",
  "publisher": "onlyutkarsh",
  "private": false,
  "qna": true,
  "repo": "https://github.com/onlyutkarsh/InfoBarDemo"
}
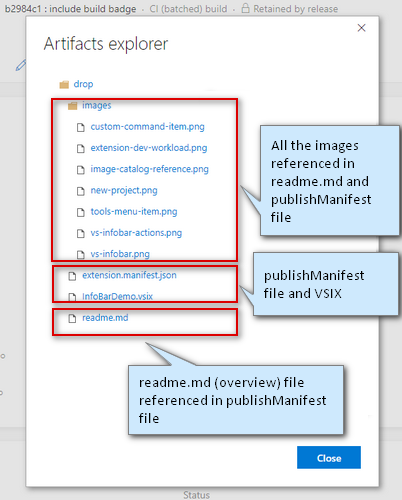
Notice that I have my extension overview page as “readme.md” (The contents of readme.md appear on extension home page in the VS Marketplace). And because I have few images referenced in my readme.md file, I need to add and correctly map all the referenced images under assetFiles section.
Next, verify and adjust other information like Product ID, Description etc in your source.extension.vsixmanifest file. For example, I added the Description and also added preview image which appear in the marketplace page. You can check the commit here.
Setting up the Build in Azure Pipelines (Continuous Build)
My extension targets Visual Studio 2017 and building the extension is simple on Azure DevOps Service’s Hosted Agents as it already has Visual Studio 2017 installed.
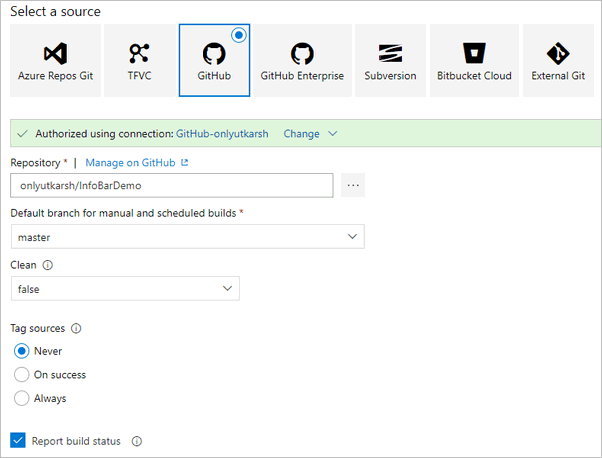
So I created a new build pipeline and added the GitHub repo as source.
The next action we need to take is, adding the build steps to generate build artifacts to publish to marketpace. We will be publishing number of files as build artifacts - E.g. readme.md, VSIX file, publishManifest file etc.
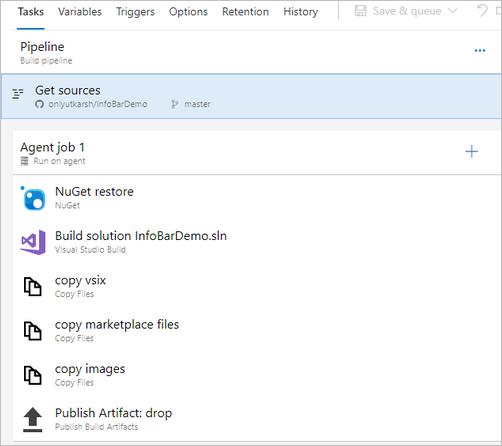
As you can see from the image above, I am doing following operations in my build definition,
- Get all the nuget references using Nuget restore
- Build the solution
- Copy the
vsixfile to artifacts directory - Copy the files required for marketplace (readme.md and publishManifest files) to artifacts directory
- Copy all the images referenced in readme.md in the same structure to artifacts directory
- Finally publish the artifacts directory as build artifact so that it can be consumed for deployment.
For simplicity, I am not incrementing the version of the extension here, but you may also want to increment version each time you trigger the build.
The final artifacts produced by the build are like this.
Setting up the Release in Azure Pipelines (Continuous Deployment)
Now that our build produces the artifact we need correctly, its time to set the release pipeline and publish our extension to VS Marketplace.
Head over to Releases hub and create New release pipeline. I have added a single stage called marketplace as below. I have added build output we created in previous step as an artifact.
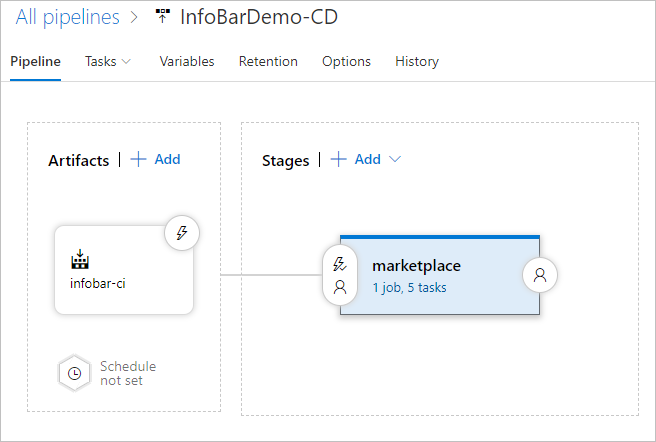
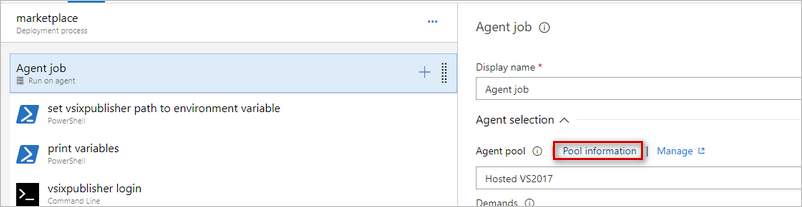
- I am running this release pipeline on
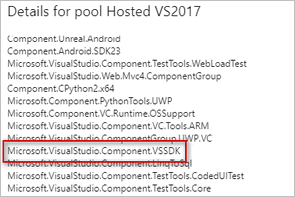
Hosted VS2017 poolas I know it hasVisual Studio 2017and also hasVSSDKinstalled. How do I know that? A new Azure DevOps agents show all the software’s installed within the pipeline itself.- VSIXPublisher.exe is available from VSSDK folder under Visual Studio install directory at
${VSInstallDir}\VSSDK\VisualStudioIntegration\Tools\Bin\VsixPublisher.exeandHosted VS2017 poolshows me that componentMicrosoft.VisualStudio.Component.VSSDKis available - which is Component ID for Visual Studio SDK.
Okay, we now have everything we need, right artifacts and right agent pool to do our deployments. So lets add steps to deploy our extension. My deployment has following steps.
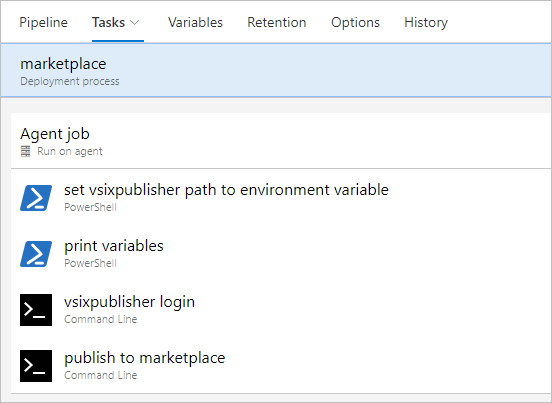
As you can see from the screen shot above, this is what I am doing in my deployment.
- Identify the
VSIXPublisherinstall location and make it available as a pipeline variable so that it can be consumed by other tasks in the pipeline. I am doing this using a out of the boxPowershelltask.
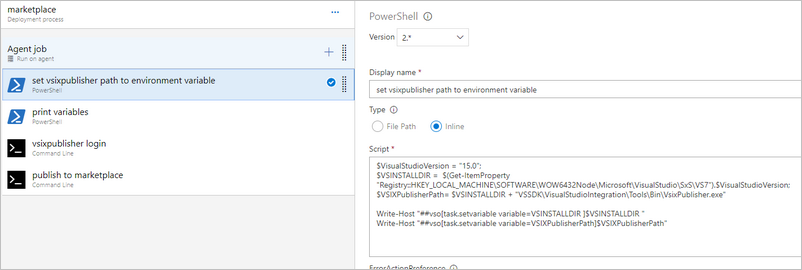
The Powershell used in the task is as below
$VisualStudioVersion = "15.0";
$VSINSTALLDIR =  $(Get-ItemProperty "Registry::HKEY_LOCAL_MACHINE\SOFTWARE\WOW6432Node\Microsoft\VisualStudio\SxS\VS7").$VisualStudioVersion;
$VSIXPublisherPath= $VSINSTALLDIR + "VSSDK\VisualStudioIntegration\Tools\Bin\VsixPublisher.exe"

Write-Host "##vso[task.setvariable variable=VSINSTALLDIR ]$VSINSTALLDIR"
Write-Host "##vso[task.setvariable variable=VSIXPublisherPath]$VSIXPublisherPath"
In the first 3 lines, I am detecting the installed location of the Visual Studio 2017 using the registry key. 15.0 is the internal version of Visual Studio 2017.
In the last two lines of the code, I am dynamically generating two pipeline variable using logging commands. The critical line to note is, in the last line of the script I am setting the complete VSIXPublisher.exe path to a variable named VSIXPublisherPath.
-
In the second step of the pipeline, I am just verifying that the variable set in the above step is available to us, by printing all the variables in the pipeline. And based on the deployment logs I see that it is available.

-
To publish the extension to the marketplace, we first need to login using
VSIXPublishertoo. The next step is doing exactly that. For this command we need to pass our PAT token used for our publisher account. The login command syntax is as below.
VsixPublisher.exe login -personalAccessToken "{Personal Access Token}" -publisherName "{Publisher Name}"
So I add my PAT token and my publisher name and add them as Pipeline variables so that they are available for pipeline tasks. I made sure I mark my PAT token as a secure variable so that it does not show up in the deployment logs.

If everything went right, during deployment you will see the login successful message.

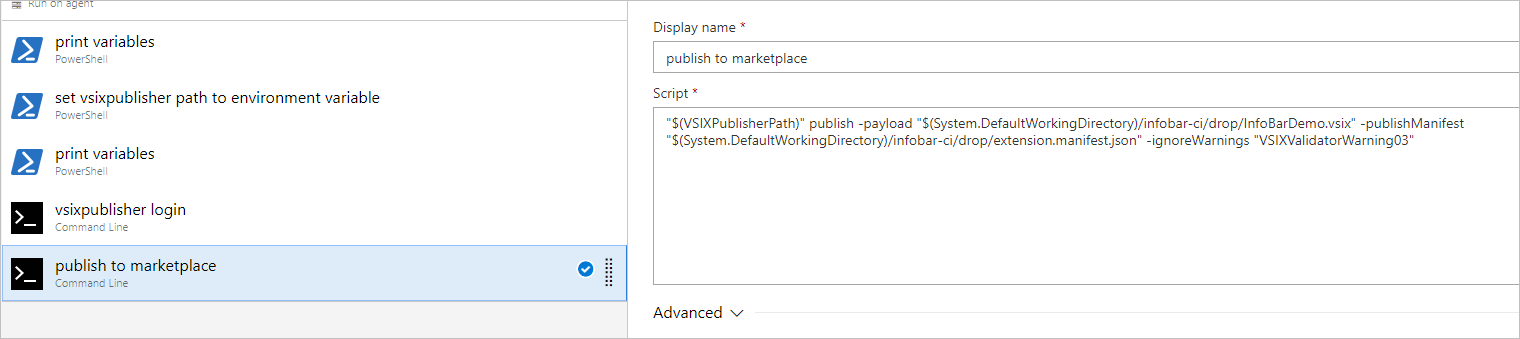
- The final step is to actually publish the extension. The command for publishing the VSIX is as below.
VsixPublisher.exe publish -payload "{path to vsix}" -publishManifest "{path to vs-publish.json}" -ignoreWarnings "VSIXValidatorWarning01,VSIXValidatorWarning02"
When I ran this command initially the deployment did show a warning of type
VSIXValidatorWarning03as shown in screenshot below. The warning was that my extension does not derive from AsyncPackage. This is a valid warning, as starting with Visual Studio 2019, synchronous auto loading of extension will not be supported.

However, for this demo extension, I decided to ignore the warning. So I updated the command to ignore the warning.

The Release Pipeline deployment logs shows exactly the same output.

That’s it, at this point marketplace will validate your extension and makes your extension available.
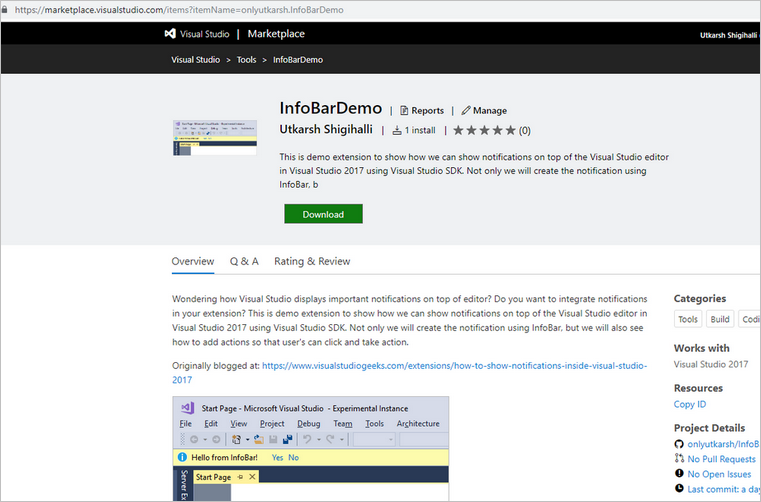
See my Demo extension on the VS marketplace here
Future plans and Conclusion
I am working on transforming this in to an open source marketplace extension so that its easy to consume. It will hopefully also make others to use it as is without passing parameters/creating variables. I will post an update once the extension is avaiable.
If you are an extension developer as I am, doing CI/CD for your Visual Studio extensions is pretty exciting stuff. You could not do continuous delivery of your Visual Studio extensions previously. Having made VSIXPublisher.exe tool available, developers can now deliver extensions to Marketplace quickly and more consistently using Azure Pipelines.
Thats it for this post - Thanks for reading this long post and I hope you found this post useful.